Introduction
In this part of the series, I’ll ilustrate the problem to test Unreal Engine classes and one approach to write the tests. As you will probably realise, when doing unit tests a lot of problems related to how your dependencies are organised will crop up. This is one of the greatest benefits of the tests in my opinion, make you constantly be thinking about what your code depends on, how to break these dependencies. It seems like a lot of work in the short term, but in the long run it will payoff, since it is easier to reuse and maintain decoupled code than coupled code.
Creating a map and setting as default
Open UE4Editor and ExampleGame project. By default, Unreal will create an Untitled map. Save this map as DefaultMap (it will create the file DefaultMap.umap in ExampleGame\Content). Set the default map of the game to DefaultMap.umap (in menu Edit | Project Settings | Maps & Modes | Game Default Map). This will be the “entry point” for your game. You will noticed when changing this that Unreal updates your ExampleGame\Config\DefaultEngine.ini.
I always like to observe what kind of magic the editors, IDE’s or whatever productivy tool does under the hood. Which is usually changing some files, that are either binary (case of the map) or text file (case of the DefaultEngine.ini), this is really interesting to understand how the build tools works and also the engine generally.
Create a new C++ class
Most of the examples in this series will be based on the “FloatingActor” example from Unreal Docs (https://docs.unrealengine.com/en-us/Programming/QuickStart), but I’ll do a kind of a TDD version to discuss the issues that crops up whilst writing tests.
Go to File | New C++ Class | Actor. Type FloatingActor (name of your class), ExampleGame (which game you are creating the class), Public (we will need access from the test app) and you can create on the default game module folder (ending in Source/Game/ExampleGame/).
You will notice that Unreal Editor will create the file FloatingActor.h and FloatingActor.cpp on the ExampleGame module. This is where you should starting creating your code.
Creating your first test in Google Test
Before we start adding the tutorial code there, we will try to create our first test on Google Test for our FloatingActor. In TDD, the motto is to do everything in very little steps, always supported by tests. So, you should write a test with a very little new requirement (something that you expect your code to do that it doesn’t do) to make your test fail (red), then you change the implementation to satisfy that little requirement (green) and other previous requirements, then you improve your code with a better implementation (refactor). Red, Green, Refactor. A lot of people do only the Red and Green, but trust me, the best part is the Refactor. And that is what the tests will enable you to do in the long run.
So, when you are running out of inspiration to write your first test, I always like to start with the most basic case. Checking if when you create a new instance of your object it doesn’t throw. It seems to be a stupid test, but it ensures you can create one instance of your class. If your class depends on a lot of things, you will soon find out.
So, we will go to our GoogleTestApp, we can create a new test class. I like to use the Given/When/Then naming to write the tests, and that’s why I’ll call my test class GivenAFloatingActor.cpp. Because Unreal Editor doesn’t know anything about our test app, I’ll create this manually in the directory ExampleGame\Source\Tests\GoogleTestApp\Private. After you create the file, you can run GenerateProjectFiles and you will see this file in your project in Visual Studio.
The first version of our file would be:
#include "GoogleTestApp.h"

#include "gtest/gtest.h"

class GivenAFloatingActor: public ::testing::Test {

};

TEST_F(GivenAFloatingActor, WhenConstructingShouldNotThrow) {

}
This should compile and give you a discoverable and green test, because it doesn’t do anything.
Because we want to test our ExampleGame and our test app doesn’t know anything about it, since they are completely independent projects, we need to add a reference. This is done changing the GoogleTestApp.Build.cs file to:
namespace UnrealBuildTool.Rules {
	public class GoogleTestApp : ModuleRules
	{
		public GoogleTestApp(ReadOnlyTargetRules Target) : base(Target)
		{
			PrivateDependencyModuleNames.AddRange(
				new string[]
				{
					"GoogleTest",
					"ExampleGame"
				}
			);
			PrivatePCHHeaderFile = "Private/GoogleTestApp.h";
		}
	}
}
If you rebuild your project now, you will realise that your compilation time increased dramatically and a lot of things you never heard about are being compiled. Also, the result I’ve got was actually some compilation problems. First related to missing MeshDescriptionOperations module, then a linking problem related to SampleRate:
LNK2019 unresolved external symbol src_strerror referenced in function "bool __cdecl Audio::Resample(struct Audio::FResamplingParameters const &,struct Audio::FResamplerResults &)" (?Resample@Audio@@YA_NAEBUFResamplingParameters@1@AEAUFResamplerResults@1@@Z)
This obviouly happens because when I’ve added the dependency to ExampleGame, ExampleGame depends on other Engine modules, and other specific build configurations. If I spend a week here, I’d probably make this compile, tweaking defines and add more dependencies, but my point here is just to explain why organising your dependencies is very important.
Even if you manage to make this compile (which I did in some other project and version of the engine) you will realise that you won’t be able to just create an instance of AFloatingActor. This happens because the GENERATED_BODY() unreal macro adds a lot of magic to your class, including making your constructors private. This is done to make sure new instances are only created (or spawned in game language) if you have a world.
You could go down the route of trying to create a world, which probably will depend on the engine, then you may create an engine, which will probably depend on a game loop and down you go in the rabbit hole.
And after you do all of this, you will realise that it is not an unit test anymore, because you are relying on the behaviour of a lot of external classes.
It is very frustrating, but I thought would be important to demonstrate this, to clarify what is the problem to do unit tests in Unreal code.
The interesting thing is that trying to write the simple test to construct a class helped you to get feedback about a dependency problem in your application. The tests are constantly giving feedback about your code, but sometimes this feedback is not easy to listen and understand. In this case, the test is trying to tell you: you are trying to test something that is pulling a lot of dependencies.
First attempt: Your dependencies
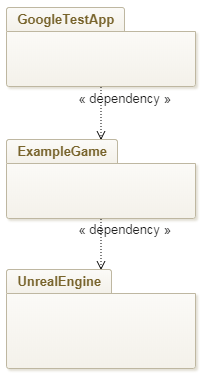
Breathe. Get out of the rabbit hole and look at the big picture. How your dependencies looks like?
Your component dependencies would look like:
Your class dependencies would look like:
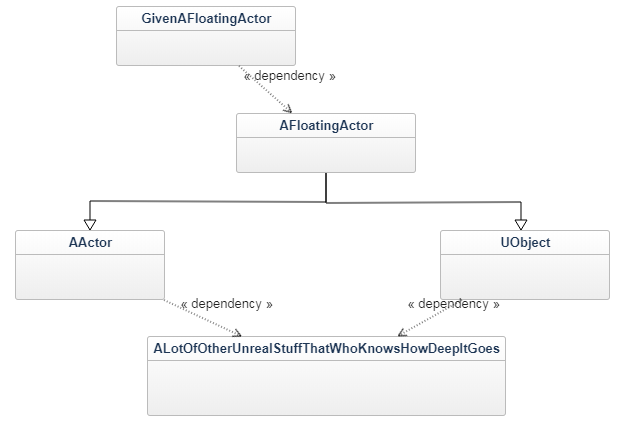
A dependency means another definition that you need in order to compile your code. It can be a referenced class, enum, type, macro, global variable, singleton, etc.
If you are not familiar with UML notation, the dependency arrows means a dependency, as defined before and the hollow-end arrow (for example, connecting AFloatingActor to AActor) means “generalisation”, which can be understood as implementing an interface or inheriting from a class. In this example, it means that FloatingActor inherits from AActor.
Obviously there’s no class called ALotOfOtherUnrealStuffThatWhoKnowsHowDeepItGoes. There’s actually a lot of things, and that’s why we’ve got the linking error in the previous step.
How do we break the dependencies?
So, the first problem is that Unreal Engine imposes its own interface and hides the constructor on AFloatingActor. What we can do is instead of writing our logic directly inside AFloatingActor, we will create our own class that holds this logic. But if we create this class inside the existing ExampleGame module, we obviously, from the compilation perspective will fall in the same problem of depending on the engine. And that’s exactly what I’d like to avoid.
So, the big steps we will do here will be:
- Create a new module with our isolated code from Unreal Engine
- Test-drive our logic
- Use this logic in our ExampleGame
Creating a new module for our Game Logic
So, we will start a new module, which I’ll call “ExampleGameCore” (naming things is one of the most difficult problems in programming). So, to create this new module, we will create a directory ExampleGame\Source\GameCore\ExampleGameCore. Inside this directory, we will add the Private and Public directories and the mandatory ExampleGameCore.Build.cs, ExampleGameCore.cpp and ExampleGameCore.h.
ExampleGameCore.cpp
#include "ExampleGameCore.h"

ExampleGameCore.h

#pragma once

ExampleGameCore.Build.cs


using UnrealBuildTool;

public class ExampleGameCore : ModuleRules
{
	public ExampleGameCore(ReadOnlyTargetRules Target) : base(Target)
	{
		PCHUsage = PCHUsageMode.UseExplicitOrSharedPCHs;

		PublicDependencyModuleNames.AddRange(new string[] {  });

		PrivateDependencyModuleNames.AddRange(new string[] { "Core" });
	}
}
Don’t forget that every time you change the files, you need to re-run GenerateProjectFiles in order to use them in Visual Studio.
Then you will probably ask: why “Core”? It is a very good question, with more than one answer. First, because Unreal defines some very basic types, like FName, FArray, TSharedPtr and other things that you may be inclined to use, unless you want to convert all of this. Second, because unreal defines a macro like MODULENAME_API that you add to class definitions built under UnrealBuildTool (our example here). This macro is what allows your methods to switch between dllimport/dllexport or whatever other black magic unreal wants that involves calling conventions to do to make your code compile in all flavours.
I’ll probably work on one approach that isolates your code completely from Unreal Engine, but for this part of the series, I’ll still depend on “Core”.
Once you created that, you can create in your CFloatingActor.h inside the public directory and your CFloatingActor.cpp on the private directory. My choice for “C” was to as an prefix for “Core”. You can name whatever suits you best. I’d avoid using the same names as unreal classes, to avoid some duplicated names that clashes with Unreal Editor names.
So, our CFloatingActor.h will now look like:
class CFloatingActor {

};
Then you will add to your GoogleTestApp.Build.cs a reference to this new module:
namespace UnrealBuildTool.Rules {
	public class GoogleTestApp : ModuleRules
	{
		public GoogleTestApp(ReadOnlyTargetRules Target) : base(Target)
		{
			PublicDependencyModuleNames.AddRange ( new string [] {  } );

			PrivateDependencyModuleNames.AddRange(
				new string[]
				{
					"GoogleTest",
					"ExampleGameCore"
				}
			);
			PrivatePCHHeaderFile = "Private/GoogleTestApp.h";
		}
	}
}
Now, if you compile GoogleTestApp you shouldn’t have any compilation, linking problem, just an empty green test running. Now we will do the first baby step. Including our CFloatingActor and creating one instance to pass our WhenCreatingShouldNotThrow test:
GivenAFloatingActor.cpp:
#include "GoogleTestApp.h"

#include "gtest/gtest.h"
#include "ExampleGameCore/Public/CFloatingActor.h"

class GivenAFloatingActor: public ::testing::Test {

};

TEST_F(GivenAFloatingActor, WhenConstructingShouldNotThrow) {
	CFloatingActor* c = new CFloatingActor();
	ASSERT_NE(nullptr, c);
	delete c;
}
So, you should notice that this code will not only compile, but should take less than 10 seconds. This is because you got rid of all your dependencies.
Also, I used a “new” allocation and delete, just to make some of the warnings of the compiler to be happy. We’ll improve this later. Another important information is the macro ASSERT_NE. This is part of Google test and means “Assert non equal”. It basically asserts that the pointer is not null. In case the assertion fails, you will have a failing test.
Writing the game logic and tests
The ideal way of writing this is using test-driven development, which is a whole concept that I recommend you to read a good book on the topic. There’s a great on in C++ which is Modern C++ Programming with Test-Driven Development, from Jeff Langr (I like the subtitle: Code Better, Sleep Better). For this post, I’ll write the end result and describe the process used to get there.
If we look at the original example of the FloatingActor, you will notice the following logic:
FVector NewLocation = GetActorLocation();
float DeltaHeight = (FMath::Sin(RunningTime + DeltaTime) - FMath::Sin(RunningTime));
NewLocation.Z += DeltaHeight * 20.0f;       //Scale our height by a factor of 20
RunningTime += DeltaTime;
SetActorLocation(NewLocation);
Here we can spot some interesting dependencies: GetActorLocation and SetActorLocation (defined in AActor) and FMath::Sin, which although is a static class it is a dependency.
My approach here will be how to isolate this logic from its dependencies. The FMath::Sin is not necessarily a problem, because the Sin function has a stable behaviour and don’t depend on anything else and we already have a reference to core. I’ll remove this dependency just as an example of how it can be done.
So, the way we can get rid of dependencies is applying the dependency inversion principle. In short, the idea is instead of depending on the concrete class, you will depend on abstractions. How is this in the real world?
First we will create an abstraction for the Actor, which I’ll call IUnrealActor and will be created in the same directory as our GameCore classes (ExampleGame\Source\GameCore\ExampleGameCore\Public):
#pragma once

#include "CoreMinimal.h"

class IUnrealActor {
public:
	virtual ~IUnrealActor() = default;
	virtual void SetActorLocation(FVector location) = 0;
	virtual FVector GetActorLocation() = 0;
};
The idea here is to create a pure virtual class, which is a class with no implementation at all. This in languages like C# and Java is called an interface. The reference to CoreMinimal.h is necessary because FVector depends on it. The virtual destructor is also necessary, otherwise the classes that implements IUnrealActor will not invoke the destructor properly.
The second abstraction I’ll create is the IUnrealMath, in the same directory as the previous one:
#pragma once

class IUnrealMath {
public:
	virtual ~IUnrealMath() = default;
	virtual float Sin(float Value) = 0;
};
Then, for the header of CFloatingActor.h, we will have:
#pragma once

#include "ExampleGameCore/Public/IUnrealActor.h"
#include "ExampleGameCore/Public/IUnrealMath.h"

class EXAMPLEGAMECORE_API CFloatingActor {
private:
	IUnrealActor& mActor;
	IUnrealMath& mMath;
	float mRunningTime;
public:
	CFloatingActor(IUnrealActor& actor, IUnrealMath& math);
	void Tick(float DeltaTime);
};
Some interesting things about the CFloatingActorHeader:
- EXAMPLEGAMECORE_API is needed by Unreal Engine and implies a dependency to Core, which will have the DLLIMPORT or DLLEXPORT macro defined which EXAMPLEGAMECORE_API will translate to.
- The constructor uses member initialisation to make sure that you will receive instances of IUnrealActor and IUnrealMath. This idea of sending the dependencies as constructor parameters is defined in the design pattern dependency injection.
For the implementation of CFloatingActor.cpp:
#include "ExampleGameCore/Public/CFloatingActor.h"

CFloatingActor::CFloatingActor(IUnrealActor& actor, IUnrealMath& math) :
	mActor(actor),
	mMath(math),
	mRunningTime(0)
{
}

void CFloatingActor::Tick(float DeltaTime) {
	FVector NewLocation = mActor.GetActorLocation();
	float DeltaHeight = (mMath.Sin(mRunningTime + DeltaTime) - mMath.Sin(mRunningTime));
	NewLocation.Z += DeltaHeight * 20.0f;
	mRunningTime += DeltaTime;
	mActor.SetActorLocation(NewLocation);
}
As you can see, the implementation doesn’t change very much from the original one, apart form the fact that instead of using the static FMath::Sin and the GetActorLocation implemented in AActor, we are using the ones injected by our constructor, allowing us to implement our logic without having any dependency from Unreal Engine (thanks polymorphism for that).
The tests, which will go on GivenAFloatingActor.cpp, should look like:
#include "GoogleTestApp.h"

#include "gtest/gtest.h"
#include "gmock/gmock.h"
#include "CoreMinimal.h"
#include "ExampleGameCore/Public/CFloatingActor.h"
#include "ExampleGameCore/Public/IUnrealActor.h"
#include "ExampleGameCore/Public/IUnrealMath.h"

class MockUnrealMath : public IUnrealMath {
public:
	MOCK_METHOD1(Sin, float(float Value));
};

class MockUnrealActor : public IUnrealActor {
public:
	MOCK_METHOD1(SetActorLocation, void(FVector location));
	MOCK_METHOD0(GetActorLocation, FVector());
};

class GivenAFloatingActor : public ::testing::Test {
protected:
	MockUnrealActor mMockActor;
	MockUnrealMath mMockMath;
	CFloatingActor mFloatingActor;
	FVector mVector;
public:
	GivenAFloatingActor() :
		mFloatingActor(mMockActor, mMockMath) {

		mVector.X = 0;
		mVector.Y = 0;
		mVector.Z = 0;

		ON_CALL(mMockActor, GetActorLocation()).WillByDefault(::testing::Return(mVector));
	};
};

TEST_F(GivenAFloatingActor, WhenFirstTickShouldNotMove) {
	EXPECT_CALL(mMockMath, Sin(::testing::_)).Times(2);
	EXPECT_CALL(mMockActor, GetActorLocation()).Times(1);
	EXPECT_CALL(mMockActor, SetActorLocation(::testing::Field(&FVector::Z, 0))).Times(1);

	mFloatingActor.Tick(0.0f);
}

TEST_F(GivenAFloatingActor, WhenTicksTwiceShouldMoveBySinDifferenceTimes20) {
	EXPECT_CALL(mMockActor, GetActorLocation()).Times(2);
	EXPECT_CALL(mMockMath, Sin(0.0f)).WillRepeatedly(::testing::Return(0.0f));
	EXPECT_CALL(mMockMath, Sin(1.0f)).WillRepeatedly(::testing::Return(1.0f));
	EXPECT_CALL(mMockActor, SetActorLocation(::testing::_)).Times(1);
	EXPECT_CALL(mMockActor, SetActorLocation(::testing::Field(&FVector::Z, 20.0f))).Times(1);

	mFloatingActor.Tick(0.0f);
	mFloatingActor.Tick(1.0f);
}

TEST_F(GivenAFloatingActor, WhenTicksThreeTimesShouldConsiderDifferenceBetweenLast2Ticks) {
	EXPECT_CALL(mMockMath, Sin(0.0f)).WillRepeatedly(::testing::Return(0.0f));
	EXPECT_CALL(mMockMath, Sin(1.0f)).WillRepeatedly(::testing::Return(1.0f));
	EXPECT_CALL(mMockMath, Sin(2.0f)).WillRepeatedly(::testing::Return(0.5f));
	EXPECT_CALL(mMockActor, GetActorLocation()).Times(3);
	EXPECT_CALL(mMockActor, SetActorLocation(::testing::_)).Times(2);
	EXPECT_CALL(mMockActor, SetActorLocation(::testing::Field(&FVector::Z, -10.0f))).Times(::testing::AtLeast(1));

	mFloatingActor.Tick(0.0f);
	mFloatingActor.Tick(1.0f);
	mFloatingActor.Tick(1.0f);
}
Right. A lot going on here.
First thing, Google Mock, that’s the reason why there’s the #include “gmock/gmock.h”. Then we have the implementation of the classes MockUnrealMath that implements (or inherits from if you prefer) IUnrealMath. This kind of anotation is part of the Google Mock framework. It means that Google Mock will generate an implementation of a class that complies with that interface, to be used with the tests. These definitions, MockUnrealMath and MockUnrealActor does not need to be declared with this class. I did just to simplify this example. In fact, I recommend they should be in their own Unreal Module, which only the tests will depend on. This way you don’t need to keep redefining these mock objects for each new test.
Then we have the definition of the GivenAFloatingActor, which is a test fixture. That’s why it inherits from ::testing::Test (::testing is the namespace used by Google Test and Google Mock). We created a lot of members there, which will be instantiated for each test. The constructor only initialises these members.
Also, there’s the ON_CALL on the constructor. This is just to set that every time the method GetActorLocation is called, by default, a vector with location 0 will be returned.
Moving to each of the tests, the mechanic is similar. For the first test WhenFirstTickShouldNotMove, I’m using EXPECT_CALL to set an expectation that the method Sin will be called twice with an argument that I don’t care about (::testing::_). If this expection is not met, Google Mock throws an exception which will make the test fail. Then I set another expectation that GetActorLocation should be called once. And a third expectation that SetActorLocation should be called with a Z of 0. Then I tick with 0 of DeltaTime. And the test passes, ensuring that when the first tick happens, nothing happens.
This is the idea of how you will write test code that will tell which are the expectations you have about your code, which will not only be useful to make sure your code works, but as future documentation for your team or for your future self.
Using your code in your game
So far, we created this code, but it is not usable from the game yet. In order to do that, first we need to create a dependency between ExampleGame and ExampleGameCore. In order to do that we need to change our ExampleGame.Build.cs to:
using UnrealBuildTool;

public class ExampleGame : ModuleRules
{
	public ExampleGame(ReadOnlyTargetRules Target) : base(Target)
	{
		PCHUsage = PCHUsageMode.UseExplicitOrSharedPCHs;

		PublicDependencyModuleNames.AddRange(new string[] { "Core", "CoreUObject", "Engine", "InputCore", "ExampleGameCore" });

		PrivateDependencyModuleNames.AddRange(new string[] {  });
	}
}
The next step would be to include our CFloatingActor.h header and add an instance of our class inside our FloatingActor.h. But then we will have a little issue, because we don’t have the implementations of IUnrealActor and IUnrealMath. What will do then, is create these implementations:
ExampleGame/Source/ExampleGame/Private/UnrealActorAdapter.h
#pragma once

#include "CoreMinimal.h"
#include "CoreUObject.h"
#include "ExampleGameCore/Public/IUnrealActor.h"

class UnrealActorAdapter : public IUnrealActor {
private:
	AActor& mActor;
public:
	UnrealActorAdapter(AActor& actor);
	void SetActorLocation(FVector location) override;
	FVector GetActorLocation() override;
};
ExampleGame/Source/ExampleGame/Private/UnrealActorAdapter.cpp
#include "MyProject/Private/UnrealActorAdapter.h"

UnrealActorAdapter::UnrealActorAdapter(AActor& actor) :
	mActor(actor)
{

}

void UnrealActorAdapter::SetActorLocation(FVector location) {
	mActor.SetActorLocation(location);
}

FVector UnrealActorAdapter::GetActorLocation() {
	return mActor.GetActorLocation();
}
ExampleGame/Source/ExampleGame/Private/UnrealMathAdapter.h
#pragma once

#include "ExampleGameCore/Public/IUnrealMath.h"

class UnrealMathAdapter : public IUnrealMath{
public:
	float Sin(float Value) override;
};
ExampleGame/Source/ExampleGame/Private/UnrealMathAdapter.cpp
#include "UnrealMathAdapter.h"
#include "CoreMinimal.h"

float UnrealMathAdapter::Sin(float Value) {
	return FMath::Sin(Value);
}
So, the idea of this adapters is just to comply with the interface of IUnrealMath and IUnrealActor and delegate the calls to the destination object. This is an implementation of the design pattern Adapter, hence the name.
Then, our FloatingActor will be:
FloatingActor.h
#pragma once

#include "CoreMinimal.h"
#include "GameFramework/Actor.h"
#include "ExampleGameCore/Public/CFloatingActor.h"
#include "MyProject/Private/UnrealActorAdapter.h"
#include "MyProject/Private/UnrealMathAdapter.h"
#include "FloatingActor.generated.h"

UCLASS()
class MYPROJECT_API AFloatingActor : public AActor
{
	GENERATED_BODY()

private:
	TSharedPtr mMathAdapter;
	TSharedPtr mActorAdapter;
	TSharedPtr mCFloatingActor;

public:
	// Sets default values for this actor's properties
	AFloatingActor();

protected:
	// Called when the game starts or when spawned
	virtual void BeginPlay() override;

public:
	// Called every frame
	virtual void Tick(float DeltaTime) override;

};
FloatingActor.cpp
#include "FloatingActor.h"

// Sets default values
AFloatingActor::AFloatingActor()
{
	mMathAdapter = TSharedPtr(new UnrealMathAdapter());
	mActorAdapter = TSharedPtr(new UnrealActorAdapter(*this));
	mCFloatingActor = TSharedPtr(new CFloatingActor(*mActorAdapter, *mMathAdapter));

	// Set this actor to call Tick() every frame.  You can turn this off to improve performance if you don't need it.
	PrimaryActorTick.bCanEverTick = true;
}

// Called when the game starts or when spawned
void AFloatingActor::BeginPlay()
{
	Super::BeginPlay();

}

// Called every frame
void AFloatingActor::Tick(float DeltaTime)
{
	Super::Tick(DeltaTime);

	mCFloatingActor->Tick(DeltaTime);
}
Some thing that seems odd on this implementation is the usage of TSharedPtr to hold the member instances. This happens because since Unreal hides the implementation of the default constructor, it is not possible to use member initialisers. You could have different implementations here, not using smart pointers or even using stdlib shared pointers instead of the Unreal smart pointers.
If everything works, you should see this:
How your dependencies looks like?
After finishing this implementation, it is really interesting to revisit the dependencies and see how they look like.

As you can see, ExampleGameCore does not depend on UnrealEngine anymore. In compilation time, the test app bundles ExampleGameCore and GoogleTestApp in an executable and ExampleGame and UnrealEngine in another executable. Also, The game is completely unaware of test files.
If we look at the class diagram perspective, you will see:

At first look, it is a bit scary, since there are more classes. But the interesting things is that now the logic of your game core, CFloatingActor, doesn’t know anything about Unreal classes. This would even open a possibility of making a game that runs in more than one engine (getting rid of the Core dependency, which I’ll potentially discuss in new posts), or even simplifying the upgrade of engines in the future, since the adapters guarantee that isolation.
Also, it is important to observe that every class has a very specific responsibility, therefore a single reason for change, as the single responsibility principle suggests. AFloatingActor to comply with Unreal Interface, CFloatingActor to hold the logic for how the actor should float, UnrealActorAdapter, to interface AActor and game core classes, UnrealMathAdapter to interface FMath and game core classes and IUnrealActor and IUnrealMath to serve as a contract between game and engine.
How this dependency organisation influences your compile time?
Anyone that practices TDD knows how important is the cycle time. The shorter the cycle time, more likely that the productivity will improve. Frankly, in all situations. I sometimes wonder how games developer survives with linking times that goes over 5-10 minutes. And full compile time that can be about one hour or more.
So, for this example, I did some very quick benchmarks:
- Changing CFloatingActor.cpp and recompiling tests, after a precompiled build takes 5.26 seconds (average of 3 runs)
- Changing CFloatingActor.cpp in the game project after a precompiled build takes 21.65 seconds (average of 3 runs
In a full rebuild
- Game: 12:55 min
- Tests: 2:05 min
What about the tests in the Adapters?
Well, these ones unfortunately will need to be tested inside Unreal Engine, using an integration test approach, since it will touch Unreal Engine classes. The tests should be fairly simple, like, if you create an Actor and an ActorAdapter, you should be able to get and set locations. From Math, just running Sin() and calculating the result. But obviously the idea of this classes is to not hold any logic at all, just bypassing calls, so, they should not change at all.
Another important observation about the Unreal adapters:
- They can be reused on another unreal games, specially if written in a specific module.
- They should be very stable, not change frequently (if changes at all).
Conclusion
As we see in this example it is perfectly possible to isolate game logic from the engine, using object oriented design principles and patterns. This approach is very well used in many other industries. And on the long run, breaking your modules, responsibilities in smaller blocks will help you to achieve a code that is easier to maintain and grow, and not to say faster to compile.
Unfortunately C++ doesn’t make this easy. I personally think this is because the environment doesn’t encourage binary reuse. It always easier to compile in a monolith and not caring about the dependencies, and that’s what creates unreasonably high linking times (I got some situation of over 15 minutes to link a C++ app). Also the separation between header and source file and the need to include headers to do binary reuse adds an extra complication compared to environments like C# and Java where you can reference a binary and reuse code.
That’s why unit tests can be quite complicated to understand and to write. They require your code to be designed properly for tests and also they will enforce that discipline, since if you add add dependencies in your code, it is very likely that your tests will break, if not on compilation time, during its execution. But once you get the environment right, it is faster to iterate in your code adding new tests and fixing them as they break then rebuilding, running and manually repeating tests in a big and slow application.
I hope this helps you to setup and start doing tests with your team.

Awesome! Thank you so much for this! Well written and in-depth examples.
Only thing missing is a ready-to-go git-repo 😉
I had to add
#include “ModuleManager.h”
IMPLEMENT_GAME_MODULE(FDefaultModuleImpl, ExampleGameCore);
to ExampleGameCore.cpp, otherwise I would get a linker error:
LINK : error LNK2001: unresolved external symbol IMPLEMENT_MODULE_ExampleGameCore
see https://docs.unrealengine.com/en-US/Programming/Modules/Gameplay
You mentioned working on a version without the Core dependency. If IMPLEMENT_GAME_MODULE is really mandatory, the dependency to “Core” sadly cannot be removed.
I am a little bit worried about impact on runtime. Virtual methods cant be inlined, so if I have many many calls to the engine which are all funneled through an abstraction, this might slow down my game, right? Did you ever measure runtime of your module with direct dependencies vs. runtime of the module with inversed dependencies and using adapters?
Have a nice day,
P
Hi Peldon,
Thanks for the observation about ModuleManager.h. I don’t remember implementing it, but it makes sense.
I have further work to do related to this series and your concern about polymorphism performance is one of the reasons. I’ve been working in some benchmarks, trying to measure how long it takes to tick 10k, 20k actors doing a bunch of virtual calls back to the engine. In a core i7 the worst-case scenario for 20k actors took me an increase from 1% to 2% of the frame budget (considering a 30 fps game). For an XBox One S this was a more scary result. An increase from 10 to 20%. Although the first number, 10% already suggests that the scenario is somewhat unrealistic.
The solution for me in this case is using some conditional compilation in the adapter interfaces with then makes the game compiling without virtuals and enabling the inline.
These are alternatives I’m planning to work forward. I personally feel that the concern of the performance hit seems to be a bit of premature optimisation, but I’d be irresponsible if I completely ignore it.
Thanks for your comments!
Regards
Eric
Yeah, I completely agree that this might be premature to optimize, that’s why I asked if you checked. And of course – like you said – you can remove the indirection in the release build, so it is not a showstopper.
Today I started a little pet project aiming at doing testdriven development with unreal. Your blog was tremendously helpful. Thanks again.
Looking forward to future articles!
btw, for completeness: I also added the module in MyProject.uproject so it is built at all 🙂
Nice! I’m interested in your experience about the unit tests. If you publish anything about this, or find any roadblock, please, let me know.
Regards
Eric
Hey ericlemes, I was finally able to move to part3 of your guide! I got stuck for 2 hours this evening banging my head against the wall trying to understand why it was giving me this error:
LINK : error LNK2001: unresolved external symbol IMPLEMENT_MODULE_ExampleGameCore
Then I realised someone in the comment had a fix for it (thank you so much Peldon!!) and finally fixed that. If you have time plase update this guide with the fix so that in the future noobs like me won’t have to swear against all the old gods to make it work 😀
Unfortunately, I found myself stuck again after setting up GivenAFloatingActor.cpp with the complete test. It won’t build saying that “Coreminimal.h” in both GivenAFloatingActor.cpp and IUnrealActor.h was not found. Do I need to chante some Build.cs or am I missing something else?
Thanks!
Marco
Ah yes, I found out why. You made a mistake in “ExampleGameCore.Build.cs” when you added “Core”. It should go on the PublicDependencyModuleNames, since you are including Coreminimal in the various headers! That solved the problem 🙂
Hey ericlemes, I can’t figure out how you managed to include only “Core” in the ExampleGameCore module and then managed to NOT include anything for AActor in UnrealActorAdapter. As far as I know AActor in on Engine module. Mine is not building saying that AActor is undefined…
Hey Eric, sorry for all this spam, I had some problem understanding the last part of the guide but I’ve managed to finished it in the end! Huge thanks for this!
I took the liberty to create a git repo for this guide so that in future also others can have a look at the finished code in case they get lost. You can find it here:
https://github.com/malo88/UnrealGoogleTestExample
Hope you don’t mind.
Cheers!
Hi Marco,
I don’t mind the spam and I’m happy you are giving your contribution as well. I’ve been having absolutely no time to work with this hence the reason why I didn’t give precise answers for your questions, but I’m happy you found a way out. 90% of the problems are around how UnrealBuildTool organises dependencies, once you understand that it is kind of easy to fix the issues if you understand how C++ compilation and linking works, that’s why I didn’t bother going on details. In hindsight, If I kept a repo would make everyone lives easier, but I didn’t know that these posts would get that much interest, and I’m happy this is happening.
Regards,
Eric