Introduction
In the part 1 of this series, I described the basics around SSL. In part 2 how to create self-signed certificates. Now, the idea is how to “run” your certificate authority (CA). I will use Windows Server 2016 for this example. Again, there are probably open source options or other stacks that you could do this.
This is obviously not to run a commercial CA, but it is interesting to understand the whole process around SSL. This is the main goal.
Why I would I want to run a Certificate Authority?
There are several answers for this one. One is: for fun. That’s what I’m doing here writing this post about it. The other answer is because you don’t want to pay for every ssl certificate you need and you are still happy to have to deploy your root certificates by yourself (more about this later).
It is important to mention that I’m not a security specialist, so, if you are planning to do this on a slightly serious way, it is good to talk to search for resources created by security specialists.
Understanding the Certificate Authority Software
To run the CA, you have the necessary software, so in your Windows 2016, you should make sure that the Active Services Certificate Services / Certificate Authority is enabled. You won’t find this in desktop editions of Windows, only on server ones.
Then in your start menu, you can just run “Certification Authority” app (under Windows Administrative Tools). When you right-click the computer, you can click in Properties. In “General”, you will see the certificate. This is what we know as “Root certificate”, which is the one that once imported on a computer (In the right store, more about that later) will tell this computer that everything signed by this CA can be trusted. In this window, it only shows you the public key (.cer, Part 1 can help you if you don’t understand what that means).

Also if you right click the computer you have the option “Back Up CA”. This options enabled you to export your root certificate private key. You don’t want share that, unless you know exactly what you are doing. If someone knows the private key of a CA, he/she owns the CA. If this happens with any major CA in the world, basically a lot of computers will trust sites that they shouldn’t.
This root certificate has an expiration date. What means that at some point in time, you will need to issue a new root certificate and deploy to everyone that should trust this CA.
Requesting a Certificate
The scenario here is that a web site needs a new SSL certificate, a CA will sign that certificate and an user will trust that CA and then connect (without annoying messages) to that website. So, pay attention at those actors, which later I’ll refer as web site, CA and user.
So, the web site, will first “request” a certificate. This can be done, going to IIS Manager, selecting the server | Certificates and on the right hand site “Create Certificate Request”.

Then some information will be prompted. The most important one here is “Common name”. Common name should be the full, real domain name to that website which will be validated against the certificate. For example, if in your internal network your web site is known as mywebsite.mydomain.local, if you ask the certificate with that domain, if you later try to connect to this website as myrealwebsite.com, you will get annoying messages.
The other fields like Organization, Organizational Unit, etc., will not be validated by your https client, but, some real CA’s will validate that information whilst signing your certificate (is their job to make sure you are really you).
Then you will be prompted to select the bit length and the algorithm to generate the keys for your certificate. The file will be generated and it is just a text file with a big string inside. Some CA’s just ask you to “paste” this information.
Now, the CA needs to “sign” the certificate. This can be done, going to the CA machine, Certificate Authority app.
Signing a certificate with a CA
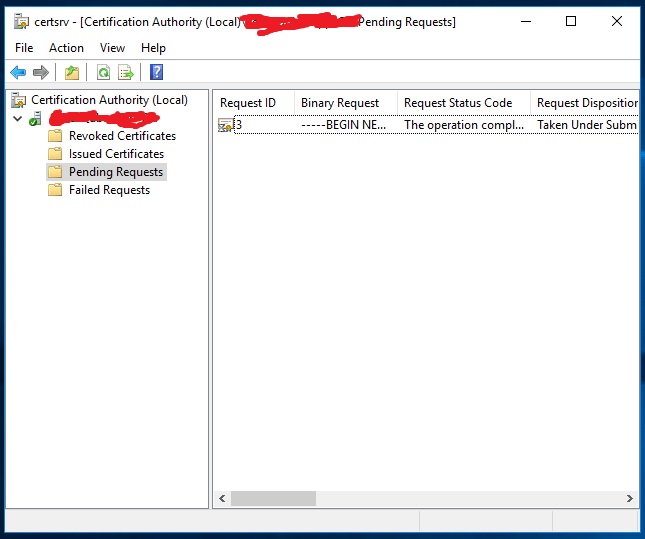
To sign the certificate, open the Certification Authority (a mmc snap in), right click in Tasks | Submit Request. Select the text file with your certificate request (generated by the web site on the previous step).
Then, your request will appear on the “Pending Requests” node on the tree view.
Right click on the request, All Tasks | Issue. Your certificate will move to the “Issued” certificates. Double click the request and on the tab and Details | Copy to file. Now you can export your .CER.
Coming back to the web site, now you go to IIS Manager, Certificates then select the request and “Complete Certificate Request”. Select the .CER file that your CA signed. In the store, select web hosting (otherwise will be available only for the user that is currently with IIS Manager open).
Now, if you go to “Manage computer certificates” and find the certificate, you will note that you will have the certificate there. The certificate will have the public key, private key (with the little key icon) and also the signature from the CA. That’s how it should be.
Connecting to the Web Server
You have to enable https on your website on IIS. Right click your web site and Edit Bindings. Create an https certificate and select your certificate on SSL certificate combo.
You will probably receive a warning about some of the certificates in the chain being missed. This is expected.
If you try now to connect to the website, using the URL you specified in your Common Name when issuing the certificate (don’t forget the https:// in the URL, since you probably have the http enabled as well) you will again see that bad annoying message:

This happened because even though your certificate is signed by a CA, this CA is not trusted by your machine.
Trusting your CA
To trust your CA, you have to add their certificate to your trusted CA certificates. Go to your CA machine, manage computer certificates. In your Trusted Root Certification Authorities store, find the certificate issued by the CA.
Double click it, go to details, save to file. You don’t want to export your private key here (is the same as giving your CA to someone else). Just the public key.
In our client machine (the one which the browser will access the web server), double click the .cer file with the Root CA certificate. Click Install Certificate, Local Machine and selected the trust root certificate store.
Testing
Then, once you trust your CA, you should be able to connect to your web server through https and a homemade SSL certificate without any messages.
Note: This process will probably need some tweaks. Some browsers (for example Google Chrome) needs also Subject Alternative Names on the certificate, which is not supported out of the box when I wrote this. With some tweaks, will probably work, but I didn’t figure out completely. This article can help to understand a bit better the issue.
I wouldn’t be surprised if the CA software is updated to add those fields by default, since the standard is changing.
